Design

Kettle, meet . . . Kettle

February 28, 2011

You know how there's always something around your house that you always mean to replace (or fix) but never get around to it?  It stays as is, either because you can't find something to replace it with, or you just don't have the time to fix or replace it?  Well, for me, that something was my kettle.

Yellow Kettle
My old kettle was not purchased for its striking good looks or bubbly personality - it was purchased because I needed a kettle, and it was the cheapest I could find ( Gasp! Yes I admit it, I purchased something knowing full well it was ugly). Whatever looks it did have were unceremoniously diminished a year or so later when one day I neglected to close the whistler and then placed it on the stove.

You guessed it - I forgot all about the kettle, and without the whistle there was nothing to remind me to remove it when the water boiled.  I forgot the kettle so completely that all the water boiled away, and my kettle developed a slight black tinge around the base where the colour started to burn off.  As ugly as it was, I just couldn't bring myself to spend the money to replace it, so it has continued to grace my stove for quite some time in its diminished state.  Until now.
New Stainless Steel Kettle
Voilà!  My sexy new kettle.  Isn't it pretty?  I love the shape.  Plus, as a major bonus, it's not yellow.

DIY

It's All My Boyfriend's Fault!

February 24, 2011

I’ve been in my unit for almost 11 months now, and I don’t have a single solitary piece of anything hanging on my walls, let alone art.  It’s a BIG, blank, white canvas.  Don’t get me wrong - I have pictures that I could display, I just haven’t figured out my furniture placement yet, so I haven’t bothered to hang any of it up.  The likelihood of my furniture (what I have) changing locations is fairly high, which means any art I did hang would probably have to move - this would require pulling the nail, patching and then painting the wall, and who needs that kind of extra work?  Not I.

It all started innocently enough.  For Christmas my boyfriend - let’s call him D, gave me framed painting of apple blossoms that he’d purchased on his fall trip to China.  I really like my gift and, wanting to show him how much, I decided I’d immediately figure out where I was going to hang it.

When I moved in I was pleased to discover that the previous owners had left a round mirror hanging on the small wall in foyer that’s immediately opposite the front door.
Round mirror hung on a white wall

While the mirror isn’t really my style, it at least gave the impression that I had made an attempt to personalise my apartment (plus it allows me to make sure I don’t have anything in my teeth before I head out the door).  This, I decided, would be the ideal spot for D’s picture – it fits perfectly on the wall, and you see it as soon as you walk into my home.  Plus, as there was already something hanging there, I wouldn’t have to actually be responsible for putting a hole in the wall.

To make a long story minutely shorter, a few weeks ago I happily removed the mirror and discovered this:
Collage of a hole in the wall

Yes, that’s right, the mirror wasn’t left there because the previous owners forgot it or didn’t want it, it was left to disguise the fact that they had tried to yank a screw out of the plaster and made a hole the size of a Toonie (For non-Canadians a Toonie is our $2 coin which has a diameter of just over an inch).  Anyways, being the gung-ho fixer-upper that I am, I immediately put the mirror back up on the wall and tried to forget the blemish I’d discovered.

As I’m sure you’ve figured out, my attempt to ignore the hole in my wall was unsuccessful.  I decided that if I was going to be serious about turning my condo into a home I would have to start with some sort of small project.  This, I decided, would be the small project – how much work could patching a wall be?

The foyer has been wallpapered with some Anaglypta paper which I quite like, and have no intention of removing.  Properly patching a hole in plaster requires the applying of filler, and then sanding it down smooth so the patch is undetectable.  Obviously with the paper on the wall I wasn’t able to sand it down properly, but I think I made a valiant effort.  I’m honestly not all too concerned with the rough surface as I fully intend to cover the blemish with D’s picture.
Patched hole in a wall

I though this would be the end of my small project – I was sadly mistaken.  Filling the hole had left a few marks on the paper, which while minor, were quite apparent when you’re standing a foot away from them analysing your handiwork.  The wall would have to be painted, and if you paint one wall, so must the others be painted lest they look like a paint chip with four slightly different shades of white.
White paint collage
All paint by Benjamin Moore
Of course, once I decided that the walls would have to be painted I realised that the ceiling would have to be done too.  The ceiling in the foyer has a popcorn finish, and is the only room in the entire apartment to have been bestowed with this honour.  It also hadn’t been painted in many years and now had a decidedly yellowish tinge.  I’ve painted many a wall in previous apartments, but this would be my first ceiling.  Oh joy.

Have you ever heard any horror stories about painting??  I assure you – I experienced them all in the past few weeks.  My foyer is only about 5’ by 8’, so it’s not a huge space.  I had a half can of ceiling paint which I figured would be sufficient to at least do one coat.  I’d heard the rumour that textured ceilings magically absorb paint, but I wasn’t quite prepared for just how much paint could disappear.  I literally managed to cover only about 25 sq ft of ceiling when my paint ran out.
Half painted ceiling

To add insult to injury a piece of the popcorn ceiling the size of a deck of cards fell down leaving me with another conundrum – do I try to patch it, or just paint over it.  Having seen some patch work before I decided to just paint the area to see how it looked, and I think that unless you’re looking, you can’t really see it (Thank god!!).
Ceiling collage

As you may remember from my earlier post, my foyer isn't really big but it does have 6 doors.  Six doorways do not equal less area to paint - it equals a huge amount of taping, and a lot of cutting-in around moulding and baseboards.  Taping and cutting-in equals time.  I will admit that I tried to figure out a way I could avoid doing both, but I realised that I would end up spending more time either being extra careful when I painted the walls, or having to repaint if I wasn't careful enough.  Sigh.

Three of the doors in my foyer are regular store-bought hollow-core doors and unfortunately, once the walls had their rejuvenation it became very obvious that the person(s) who installed them never bothered to paint over the factory primer.
foyer Doors Collage
Foyer doors - Before and After a fresh coat of Primer
The other three doors thankfully didn't need any work - one is my front door which is stained wood, two are single French doors which my mom ever so kindly painted for me last spring.  I have to admit that I did take a shortcut here.  I'm sure the proper way to paint a door is to remove it from its hinges, lay it down flat, paint and then reinstall it.  I left it on its hinges and painted it in place just covering the hinges with tape.   I honestly didn't think that I'd be able to rehang the doors by myself, and by this point I was tired of  having a paintbrush in hand.

There were times when I thought this small little project would never end.  It was weeks of having dropcloths underfoot, and doors with no handles.  I had to make three separate trips to the hardware store, purchase 3 x 1 gallon cans of paint - one ceiling, one wall, and one trim (which are incredibly heavy when you don't have a car and have to carry them home), a new roll of masking tape, and a smaller paintbrush to reach the wallspace between two door moldings that is only about an inch wide.

All that work, and I'm not honestly sure how much of a difference it made in terms of how the room appears.   However, while the walls, ceiling and doors may still be white, the piece of art that started this whole adventure has now been hung for all to see, and I think it looks great!
Cherry Blossom art hung on the wall

Decorate

What a Birch!

February 17, 2011

I have about a 15 minute walk to get to and from transit everyday and most mornings I'm too tired to pay much attention to the stores I walk by, let alone the things they might have displayed in the windows (plus, at this time of year it's too cold to stop and admire anything).  That changed the other day when I passed by Veranda Home and Garden on Yonge Street and saw this:
Virch-look vase
Birch Vase - So Pretty! (the picture doesn't do it justice)
Sigh.  I'm in Love.  I think this would go perfectly in my dining room - once I've finished decorating of course (I have grand plans).Unfortunately, there are a few roadblocks between me and my love:
  • The price: $100 is a lot of money for a vase.
  • I NEVER buy myself flowers, so having a vase is pointless - I'd be relegating the poor thing to a life of unfulfilled purpose, and that's just mean.
  • My dining room is FAR from finished.  Buying accessories for a unfinished room seems silly.
I'll just have to continue to admire it from afar, and hope that the store has a 'One day - 80% off sale'.  It could happen - right?

Design

Fab Find: Louis XV Style Chairs

February 14, 2011

For quite some time I've been looking for some more furniture for my living room.  I have a couch (which has its own long story) but that's pretty much it, and the space looks a little bare and forlorn.  Having so little furniture also makes figuring out furniture placement difficult, so what I do have is pushed unimaginatively against the walls.

My decorating budget isn't huge (let's be honest - it's teeny-weeny), so I've been trolling both Kijiji and Craigslist in the hopes that someone would be selling something that would fit perfectly in my space at an excellent price.  Chances of finding the perfect piece are admittedly quite slim, but a girl can dream right?

Over the past little while there have been a few things that have caught my eye, but as is the case with items posted on either site you have to act QUICKLY as you can be sure if the item attracted you, it's caught someone else's notice as well.

On Friday morning I was surfing Kijiji when I came across a posting that immediately drew my attention. The only issue was the item was located in Cambridge which is 85km west of Toronto, and I don't have a car. Fortunately I have recently become a member of Zipcar.ca which is a car sharing service in Toronto.  This was the perfect opportunity to try it out.

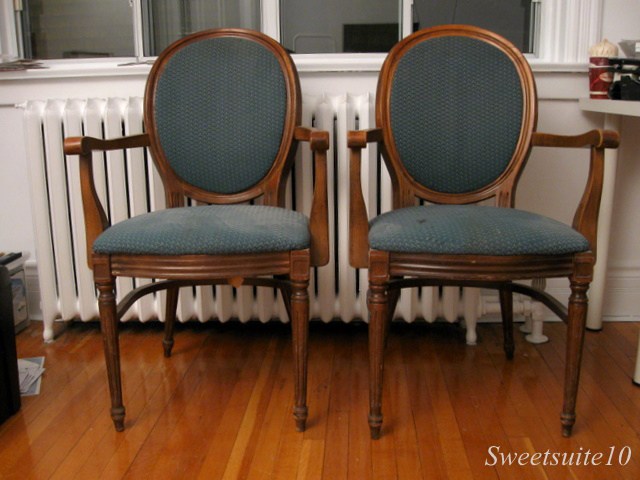
Anyways, to make a long story short - here is what I successful in procuring:
My new Louis XV style chairs

And the best part?  The Price.  Would you believe that these were purchased for $75 for the PAIR???  When you factor in the $35 I spent on the car rental, I got both chairs for a total cost of $110!!!  Woohoo!!

Now of course I have to figure out what to do with them.  They obviously need to be cleaned and reupholstered, but I need to decide if I should paint them, or just leave the wood stained.  That decision will probably be made after I clean them up and take a closer look at the condition of the current finish.  I'm open to suggestions if anyone has them.

In the meantime I'm going to daydream about what my new chairs could become with a little elbow grease from yours truly, and hopefully a lot less money than what the chairs in the inspiration shots below cost.  Unsurprisingly, I absolutely LOVE #4 - but who'd spend that much on one chair?
Louis XV chair Inspiration collage
1. Elte 2.Anthropologie, $798 USD 3.Elte 4.Dransfield and Ross, $3,125 USD 5.Restoration Hardware, $329 USD (on sale) 6.Anthropologie, $498 USD

Furniture

Can you name this chair?

February 09, 2011

I love HGTV Canada, and even though I don't have cable I can follow some of my favorite shows by watching the videos they post on their website.  They also have a blog which I read on a fairly regular basis, where they post everything from info on upcoming shows, great home spaces, project ideas and interesting products that you'd probably never know about otherwise.

On occasion they also have contests where you can win, as they call it 'HGTV swag', and in January I found out I won the quiz from December.  Woohoo!  I never win anything!

Here's what I answered correctly - Can you name the decade in which these occasional chairs were produced?
Antique Louis XV chairs
Photo credit: HGTV Canada
  1. Late 19th century

  2. 1930's

  3. 1970's
For an additional chance to win they also asked what the name of the King of France for which the style  of chair is named.

A quick Google search told me the style of chair is named after Louis XV, but the decade in which they were made was harder to figure out.  The style of chair is one that keeps popping up - the detailing changes from decade to decade, but the basic style is the same.  I thought it was a toss-up between the 1930's and 1970's, and luckily I chose right - the chairs were made in the 1930's.  I love this style of chair, and this pair in particular.  I love them so much I even emailed HGTV.ca to ask where they found them - unfortunately I didn't get an answer to the question.

Here's what I won:
HGTV Swag

So far I'm using the handy-dandy measuring tape on a surprisingly regular basis.  Because it's so small and compact I just leave it in my purse - just think about how many times you've been out and unexpectedly see something you like and wonder if it will fit in your space - now I never need to wonder -  I just pull out the tape and unfortunately usually determine it's either too big, or too small. :(

General

Mi Casa

February 06, 2011

As I mentioned in a previous post, my condo is in a lovely Spanish Colonial style heritage building in midtown Toronto.  It's a low-rise building with just 24 units and, as it was built in 1928, has all sorts of character that I feel is missing from newer buildings.
building architectural details
The front stairwell, and one of the lights flanking the front door
A major bonus with my unit is the room sizes are actually reasonable - my bedroom is 13'x9', and my closet, instead of being some pokey little cube is almost 7ft long!!  Try finding that in a new-build (and actually be able to afford it).

I've been trying to come up with a way to describe the layout of my home in a way that would enable you to picture it and I've had a little trouble.  As the saying goes - 'A picture is worth a thousand words', so here you go: 
One bedroom condo floorplan

recent posts

Like us on Facebook

Follow us on Pinterest

//]]>