Christie Antique Show

Wacky And Wonderful At The Christie Antique Show

May 29, 2011

For several years now I've heard about the bi-annual Christie Antique Show, but always a week or two after the event. This year by chance I heard about it early and convinced  my boyfriend D that it would be something different to do early on a Saturday morning. I would have said bright, except the Toronto area has been experiencing nothing but rain for what seems like months. While it didn't rain while we were at the show, I do wish I had brought my rubber boots to combat the mud.

I went to the show primarily to see and do something new, but I also brought some cash in the off-chance I spotted something I just had to have. Much to my disappointment I didn't see anything I wanted (and could afford) so I had to come home with all my money. Boo.

I brought my camera along to take some pictures of all the great stuff I found, but when I looked at my photographic collection later I discovered that I'd taken pictures mostly of rather odd things on offer at the show. Here is a selection of the items you could have brought home with you had you been lucky enough to attend.

Having issues with your neighbours? You'll need this for your bomb shelter - $55:
Vintage Fallout shelter sign

Bring realism to your next game of  'Doctor':
antique Dr.'s Instruments
Antique Doctors Instruments - Including Forceps
Every child's dream teddy bear - Mom, why didn't I have one of these?
huge Teddy Bear


New conversation piece for your living room? $125:
vintage artificial leg, with shoe
An Artificial Leg - Sock and Shoe included

For the spoiled child in your life:
antique dolphin child's ride
Dolphin Carnival Ride, or Unique Lawn Ornament

There was one piece that I loved, and this was love with a capital 'L'. Unfortunately at $15,000 it was a bit more cash than I had brought with me to the show. It's a painting by Marc-Aurèle Fortin that he painted in 1950.
Marc-Aurèle Fortin Painting

On another note, I did see one of my favorite bloggers at the show - Karen from 'The Art of Doing Stuff' which was kinda neat. I might have shocked her a bit when I just stopped in front of her and said  'I just have to say - I love your blog'. Oops - that might have been a bit rude. As I was walking away my boyfriend asked who she was, and I tried to explain about her blog. A few seconds later he exclaimed - 'I know where she's from, she used to be on OMNI TV before the Simpsons came on'. Boys are strange.

Bathroom

Bathroom Makeover - Part 2

May 22, 2011

It's been a while since I've posted anything even remotely related to my home - first I was sick, and then my trusty computer sputtered and died. My new computer finally arrived on Wednesday, but I spent the past few days doing absolutely nothing blog related - it turns out I missed the internet dreadfully when for two weeks I could only access it at home via my phone ( it's just not the same on a 3" screen).

Anyways, back to my bathroom. The second stage of the makeover has been the replacement of what I've been calling the 'bathroom bling' - the light fixture, and the sink faucet. Here's a reminder of the old fixtures:
Old Bathroom Fixtures

The aim of this makeover was to do it without spending a huge amount of money. This therefore precluded going to any of the fancy lighting or bathroom stores about town (darn) - I stuck with Home Depot.

Here is my choice for my new light fixture:
New Bathroom Light Fixture

Not bad for $59.99 right?

And here is my new faucet:
New Bathroom faucet

This is where my low-cost bathroom makeover went off the rails. The faucet was only $69.99, but unfortunately I ran into a little trouble with the installation. The short version is I looked under the sink to locate the water shutoff before removing the old fixture and didn't see it. That was a wee problem as you can't remove a faucet without first turning off the water (well you can, but you won't like the results). A call to the building management the following Monday (because, like all good DIYers, I was doing this on the weekend) confirmed that there wasn't an individual unit shutoff - in order to change my one measly bathroom faucet I had to get the water turned off to the whole building. Sigh - why can't anything be easy? In the end I arranged for the building handyman to turn off the water and install the tap, and in return I received an invoice for $170.

I had hoped to perform this makeover miracle for under $300, but with the unexpected installation expense I'm now aiming for under $400.

BTW - while the handyman was installing the faucet I had him install water shutoff's on both the hot and cold lines under the sink, this way the next time (yeah right) I change the faucet I can do it myself.

Celebrations

Wedding Shower Favours: Mason Jar Cookies

May 12, 2011

My very good friend Anna is getting married in July and her wedding party, myself included, hosted a bridal shower in her honour this past weekend. I volunteered to create the wedding shower favours that each of the guests got to take home to commemorate the event.

In principle the idea is incredibly simple - in practice it took a bit more effort than I had planned. The original idea is not mine – I should mention I borrowed it from a baby shower I attended this past January and modified a little.

Start with a simple mason jar. I found mine at Dollarama.
Dollar store mason jars

Add a personalised label with the event details. I had originally created a round label for the top of the jars, but the file was unfortunately saved on my home computer which died the Sunday prior to the shower. This meant I had to start the labels from scratch. In hindsight, it's a  good thing my original design was lost – I like the new label design much better.

These are the labels I came up with:

I used a template I found here which was originally used for water bottles. The template is in PowerPoint which before last week I was only slightly familiar with. Through much trial and error I was able to create something I’m fairly proud of.  Unfortunately you can't tell from the picture above, but the nutritional information includes things like love, happiness. trust and laughter - all  at 100%.

I attached the labels to the jars using spray adhesive I had on hand. Regular white glue would work as well.

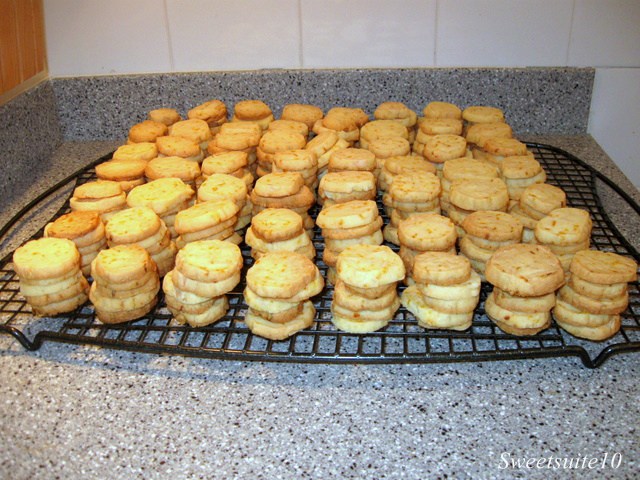
To fill the jars you need cookies, lots and lots of cookies. I ended up making close to 300.
Lots and lots of cookies on a cooling rack

I used a recipe for Almond Orange Shortbread that I found on the Martha Stewart website. The only change I made to the recipe was the baking method – in order to fit into the mason jars the cookies needed to be round, and less than 2” in diameter. I tried to find a cookie cutter of the appropriate diameter but failed miserably, so I rolled the dough into snakelike forms, and then simply cut the cookies into rounds. These cookies made my apartment smell divine for days.
Lots and Lots of cookies

The last step was placing the cookies in the jars. I had originally planned on putting a nice round number (10) in each jar, but given that the favours had to travel a bit to the shower I decided that 11 would fill-up the jars, and therefore there was less chance of cookie breakage.

Here is the finished product:
Cookies in a mason jar for a Bridal shower
The finished product
I have to say that I’m quite proud of the end result. They were quite well received by the guests, and most importantly the bride.

recent posts

Like us on Facebook

Follow us on Pinterest

//]]>