Book Review

The President is Missing - a Book Review

July 03, 2018

The President is Missing - a Book Review
It’s been a while since I did a book review – mostly because it’s been quite a while since I finished a new book. I think I’ve mentioned before that I do most of my reading while commuting to work, so that means I generally read in 30-ish minute increments. If a book is particularly riveting I’ve been known to continue when I get home (sometimes completely ignoring anything else), but those short spurts of reading can be problematic if a book is one that’s slow to get going. Given I get my books mostly in e-book format from the library they’ve been known to expire before I’m finished. In fact I had one expire last week when I was 95% complete. This was particularly annoying as it took a while for me to get invested in the story, and given the wait list it’ll be months before I get it back and by that point I’ll likely have forgotten some plot points and will have to restart it.

This past weekend was a long one for us Canadians as we celebrated Canada’s 151st birthday. It was also ridiculously hot. Since I’m not lucky enough to have a cottage to escape to, I spend a bit of time hiding from the heat indoors where there was AC.  While hunkered indoors I finished up ‘The President is Missing: A Novel’ by James Patterson and Bill Clinton. The foundation of the story is an intriguing one, and one that is completely relevant today – the US is under attack, but not by conventional methods. This time the US is the target of a massive cybersecurity breach that will see a computer virus infect every electronic device connected to the internet and render it useless. This means all electronic records (financial, medical, social, etc) will disappear, and the US economy will grind to a complete stop as anything that runs on a computer ceases to function.

The President is the narrator of this story which confused me – given the title of the book I expected the President to be, well, missing. Anyways, along with the cyber threat the President must deal with a Speaker who’s gunning for an impeachment, and a traitor within his own cabinet.

I don’t think I’ve ever read any of James Patterson’s other books so I found the incredibly short chapters of this book strange, but short chapters are apparently something he’s known for (there are 128 chapters plus an epilogue in this novel, but some are only a paragraph or two long). As a writing style I found it extremely odd, but short chapters were rather handy for my short reading spurts on the subway.

One of the marketing tag lines for this book is it’s ‘filled with information that only a former Commander-in-chief could know’ (which I confess might have been what drew me to the book in the first place), but to be honest I can’t think of anything that was ‘revealed’ in this book that only Clinton and other Presidents might know.  Sure, at one point the President leaves the White House via a ‘secret’ underground tunnel, but everyone has known about the tunnel since Kennedy and Marilyn right?

Anyways, at 500-ish pages it’s not really a quick read, but it is a fairly easy one. If you’re looking for something cerebral this isn’t a book for you, but if you’re looking for something to while away a few hours over the summer it’s a book with a assassins, stuff being peppered with bullets and/or blowing up, secret codes, and a vision for what America could be.

The President is Missing book cover
Book Title: The Pressident is Missing
Author: Bill Clinton and James Patterson
Genre: Thriller
Pages: 528
My Rating: 3 Stars
Buy the Book: Amazon
The President Is Missing confronts a threat so huge that it jeopardizes not just Pennsylvania Avenue and Wall Street, but all of America. Uncertainty and fear grip the nation. There are whispers of cyberterror and espionage and a traitor in the Cabinet. Even the President himself becomes a suspect, and then he disappears from public view . . .

Set over the course of three days, The President Is Missing sheds a stunning light upon the inner workings and vulnerabilities of our nation. Filled with information that only a former Commander-in-Chief could know, this is the most authentic, terrifying novel to come along in many years.

Design

One Room Challenge | Week Six | Kitchen Makeover Reveal

May 10, 2018

It’s finally here! Six weeks ago I decided at pretty much the last moment to participate in the One Room Challenge, I’m happy to say that despite more than a few late nights, some self-inflicted injuries, and a few hurdles that I thought might prevent me from completing this makeover on deadline, I’m ready to share what I’ve been working on (If you missed any of the weekly posts for the challenge you can read them here: week 1, week 2, week 3, week 4, and week 5).

I decided to makeover my kitchen for the simple reason that I’ve never liked it. I’ve lived in my apartment for 8 years and I’ve dreamt about tearing it out since the day I got the keys. Sadly I haven’t yet won the lottery so a full gut will have to wait, but I’m very pleased with what I’ve been able to do with my space.

Here’s what I was starting with:

White Ikea kitchen with white and yellow wall tiles
And here is my finished One Room Challenge space:
White kitchen with brass accents and Morton Salt Poster
I pulled off all the old tile with the unattractive mustard-yellow accent stripes, repaired the walls, retiled, replaced the faucet, installed a new light fixture and re-imagined the kitchen hardware. All in 6 weeks and, except for some help with the demo from my ever-helpful mom and the electrical repair that I hired out, I did all the work by myself.

I love my kitchen now that it’s complete– it feels so much bigger. I think a lot of the reason the room feels bigger is I removed the 4-inch backsplash ‘lip’ that matched my counter. That combined with the horizontal line of the mustard yellow accent tile visually shortened the room in my opinion. The actual distance between my counter and upper cabinets hasn’t changed, but it visually looks like a much larger space.

I installed the Delta Trinsic Faucet in Champagne Bronze and I’m in love. I didn’t opt for the Touch2O version because there was a nearly a $200 price difference and I figure I can’t miss what I never had in the first place. The faucet it so pretty, and it doesn’t leak like my old one! When I first installed it I was a bit concerned with the scale – I thought it might be too big, but I think that’s just because my previous faucet was so short in comparison. I have to say this was so simple to install – I was really worried given how much difficulty I had taking out my old one, but  the whole install took maybe 10 minutes.

Delta Trinsic Faucet in Champagne Bronze
If you recall I had trouble finding handles for my kitchen that met the requirements I needed (length and with a backplate) and in the end I decided to get the ones I already had plated. Yes, I could have spray painted them which would have been way cheaper, but I decided that as kitchen handles are hard-working they also need to be hard wearing. The end result is little darker than I would have preferred, but at a cost of less than $15 a pull it was still considerably less than the $50 (USD + shipping and duties) that I was quoted for the only replacement pull I could find that met my requirements.

Ikea Spann Handles metal plated
When it came to tiling I did all the work myself, and that included cutting all the tiles by hand (I used this, and this – it’s slow, but you can tile without access to an electric tile saw). I’ll be honest and say it was a lot of work, but I’m quite pleased with despite my aching hands. I debated going with white or grey grout, and in the end I went with the white. The walls aren’t perfectly straight so neither are the tiles, and because I had thin grout lines I needed un-sanded grout which wasn’t available in the shade of grey I wanted. Some might question why I went with the ubiquitous white subway tile instead of something more interesting, but I thought with the navy floor and the grey speckled countertop that anything more ‘out-there’ would have just been competing for attention.

Delta Trinsic faucet with white backsplash
White kitchen with wood cutting boards
I bought the West Elm Sphere + Stem 3-light semi-flushmount last fall with vague plans to put it in my foyer but procrastinated about installing it. I have to say I don’t think I would have liked it as much if I had installed it there as I would have been able to see its shape as easily as I can in my kitchen. The light can be installed as a pendant or a flush mount as I have and it was pretty easy to install – just make sure you read the instructions a few times before you start as they were obviously written in another language and then translated into English. I love the warm brass and the glow from the glass orbs. It doesn’t come with bulbs so when I rushed out on Monday night to buy bulbs all I could find close-by were incandescents. The three 60W bulbs emit a lot of light but are also very warm, so I’ll be replacing those shortly with LED bulbs.

West Elm Sphere + Stem Pendant in a kitchen
When I did my original plan for my kitchen I envisioned a bright and colourful piece of art on the back wall. I even spent a number of hours researching inexpensive downloadable art, but it turns out I had already found the perfect piece.  In February of last year I was in the kitchen at work and I spotted a container of Morton Salt. I think it’s an American brand as I’ve never seen it in grocery stores here, but I was struck by the packaging. Anyways, I found the logo online and had it printed in poster size and I love it.

Morton Salt Logo as art in the kitchen
If you’re curious about how much this all cost here’s my budget breakdown:
  • Handle plating: $250
  • Electrical work: $350
  • Faucet: $320
  • Tile: $130
  • Primer & Paint: $0 (I used what I had on hand)
  • Plaster, grout, baseboard, painters tape, tile cutter and tile nips, grout float, grout sponge, notched trowel, and various other supplies: $ 300
  • Light fixture: $350
  • Art: $60

    Total: $1760 
I didn’t really have a budget going into this makeover since it was such a last minute decision, but it was a bit more in the end then I had really hoped. That said, two of the more expensive items – the electrical work and the handle plating could have been skipped, but in order to get a kitchen I was happy with the costs were necessary and I'm thrilled with the results.

Here are a few more pictures as I'm a bit proud.
White kitchen
 Left side of my madeover kitchen
 Microwave above a grey counter and white back splash
 
Left side of my madeover kitchen
There you have it – my finished kitchen. What do you think? Was all my work worth it?

One room challenge Guest Participant
Want some more One Room Challenge makeovers? Make sure you check out the 20 featured designers doing the One Room Challenge, and the other One Room Challenge Guest Participants.


This post contains affiliate links.

Design

One Room Challenge | Week Five | Art Dilemma and Tiling Progress

May 03, 2018

Okay – week five. I can see the finish line on this One Room Challenge, but there are still so many things to finish before next week! My kitchen makeover is moving right along, but my to-do list seems to be getting bigger not smaller which is stressing me out. In fact, I’m taking this Friday off work in order to get a head start on the weekend in the hopes of getting most of it done.

Let’s see, what can I update you on? I finally finished all the wall prep. It’s not perfect, but it’s many, many times better than it was and I’m hoping nobody will look too carefully at the wall. My building is almost 100 years old, so imperfect walls are to be expected right??

Galley kitchen primed white
My kitchen when just primed is very boring and institutional looking.
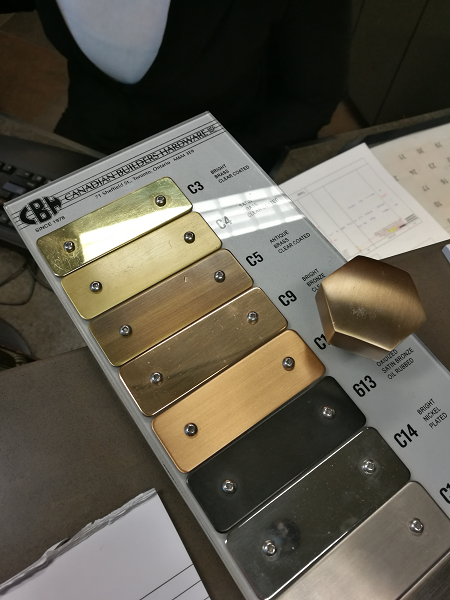
I’m hoping I’ve come up with a solution to my hardware dilemma. Late last week I took my handles to Canadian Builders Hardware in the hope of getting them plated. I won’t be able to get an exact match to the Delta faucet I bought, but I’m hoping it will be close?? I won’t know until I get them back though so there could still be some late-night spray-painting in my future.

Plating colour options from Canadian Builders Hardware
The colour options available at Canadian Builder's Hardware. The hex pull on the right is an approximate match to my Trinsic faucet. here's hoping the end result is alright.
On Sunday I went to Olympia Tile and purchased the tiles I’ll be using on my backsplash, and have finally started on this big part of the makeover. I ended up going with the 2x8 tiles instead of my original plan of the 3x6. I think they’re slightly more modern, and let’s face it – my high-gloss cabinets are not traditional in style by any stretch. I bought a hand-held tile cutter and it’s working fairly well, but as this is my first time attempting to tile it’s a bit of a slow moving process.  I spent a bit of time watching YouTube videos and found this one helpful when it came to actually tiling, and this one for tips on using the hand-held tile cutter. I still have to find one on how to properly grout tile, but one step at a time.

I have run into a hiccup though when it comes to the tiles I bought. Last night I opened the box of tiles that contained my edge pieces and discovered that instead of giving me my requested 10 bull-nose tiles that I wanted to use to edge the nib walls I mentioned in last week’s post, they gave me 10 corner pieces. So I have to go back to the store to exchange them. Grumble. I also still need to decide on grout colour – my original plan was white, but maybe, since my counter top is grey I should go with a pale grey to break up the big expanse of white?

White 2x8 back splash tile in progress
I've started the tiling of my back splash. I think the small and narrow cuts will be very hard to do. I hope I bought enough extra tiles to cover breakage. 
With the last of the major construction-y- stuff under way I’ve turned my attention to trying to decide on pretty things like art. I had originally used a wonderful piece by Leslie Weaver in my mood board, but between the plumber, electrician, hardware, tile and other material costs my budget is beyond blown. That said, I really want something big and colourful to go on that back wall – otherwise I think the kitchen will be boringly monochromatic and rather stark and institutional looking. I could try my hand at something DIY (I even have a blank canvas in my storage locker), but I don’t know that I’ll have the time if I want to get this kitchen makeover complete by next week.

I’ve spent a considerable bit of time online and surprisingly I’ve found quite a lot of downloadable art that might work. Did you know that a number of Art Institutions around the world have digitized some of their collections, and even offer some images for download? Here are a few works that I think could work in my kitchen. I think I can probably get it printed rather inexpensively at Staples or Walmart, and put it in a basic Ikea Ribba frame for under a hundred dollars.

Printable art that's free to download
1. Joséphine-Éléonore-Marie-Pauline de Galard de Brassac de Béarn (1825–1860), Princesse de Broglie by Jean Auguste Dominique Ingres, via The MET 2. Edna by Robert Henri via Los Angeles County Museum of Art 3. Coney Island by Joseph Stella via The MET 4. Peonies by Charles Rennie Mackintosh via The MET 5. Makaro by Gordon Walters via The Museum of New Zealand 6. Faustine Léo by Henri Lehmann via The MET
When I increased my budget a bit and started looking for art I could download and print for a reasonable fee (and by reasonable I mean $20 or less) there was quite a lot of choices. A lot of what I found was word art which I’m not a huge fan of, and not really the ‘look’ of what I was going for, but I did find a number that I liked. Here again I could print it and put it in an inexpensive frame.

Printable art for less than $20
1. Peonies via Jenny's Print Shop - $15 2. Orange Square by Paradigm Art on Etsy - $8 3. Floral Lady by aljahorvat on Etsy - $15 4.  Abstract by DanHobdayArt on Etsy - $11 5. Blue and Pink Abstract by DanHobdayArt on Etsy - $11 6. Australian Native Print by LilaxLola on Etsy - $7 7. Columbine Flowers Flat Lay by Vicuschka on Creative Market - $10 8. Dragon Fruit by LilaxLola on Etsy - $7 9. Pellegrino bottle by The Crown Prints on Etsy - $6
What do you think? Would you put any of these in your home? (I've got quite a few more free and reasonably priced art pieces saved on Pinterest if you're interested)

So, with one week to go before the ‘big reveal’ what do I still need to get done?
  • Finish plastering/fixing walls
  • Prime walls
  • Paint ceiling and back wall
  • Pick wall tile
  • Purchase wall tile, mastic, grout and all needed supplies
  • Finish tiling the walls 
  • Grout the walls
  • Clean up ALL THE DUST
  • Figure out what to do for cabinet pulls
  • Install cabinet pulls
  • Hang ceiling fixture
  • Figure out some art for the walls to add some colour
  • Remove old faucet {This was literally a ginormous pain the neck!!}
  • Install new faucet
  • Add baseboard to the back wall
Oy – still so much to do! And at some point (hopefully in daylight, and not with my phone) I also have to take pictures so I can show you the *hopefully* finished space next week. Wish me luck!

Want some more One Room Challenge makeovers? Make sure you check out the 20 featured designers doing the One Room Challenge, and the other One Room Challenge Guest Participants

Design

One Room Challenge | Week Four | Is it Time to Panic Yet?

April 25, 2018

Hoo-boy – week four already. In last week’s post I mentioned that I had hoped to at least have started the tiling by this week. That didn’t happen as I’m still in the wall-prep stage. Sigh. I’m so sick of plaster dust being everywhere and not being able to use my kitchen as a place to make food.

Kitchen with plastered walls
My kitchen right now. The back wall looks mottled and uneven in this cell-phone picture, but that's due to the different plaster/cement that I used to patch it. The right wall in the photo is also finished.
The reasons for my lack of progress are two-fold. The main one is the fridge and stove are on the same wall and that wall requires a lot of work. Unfortunately my kitchen is so small I can only move one appliance out at a time which means repairing/patching/sanding that wall is taking at least twice as long. The other reason is I’m doing all the sanding by hand – I don’t have an electric sander so it’s taking me quite a while. Have you ever tried to sand smooth an entire wall??? It takes forever, and I’ve skim coated and plastered the back wall about three times so far in the hopes of getting it almost perfectly smooth. It was in pretty rough shape to start so I’m pretty pleased with what I’ve been able to achieve and I think I’m ready to prime it. My hope is that the primer will help me see if there’s any further patching work needed. Keep your fingers crossed that any imperfections will be so tiny I’ll be able to easily ignore them.

I asked for your opinions last week on where I should stop the tile on the far wall, but I forgot to ask what you thought about the opposite wall. There are two quarter walls on the other end with the ‘doorway’ between.  One side butts-up against a counter, the other side is against my stove. My gut is saying I should try to tile the stove side wall (sometimes cooking gets messy), but then should I also tile the opposite side wall? Should the walls match? 

Kitchen end walls - should I tile them?
I need some help deciding on if I should tile these small side walls or not? I'm a bit worried if I do as I think it will need a lot of tile cutting, but I'm worried about getting an untiled wall really dirty when cooking.
On Saturday I did a bit more research on my epic search for the perfect pulls for my kitchen. I went to Upper Canada Specialty Hardware in the vain hope that they might have, or be able to order something that might work. The problem is the pulls I have are from Ikea which uses European sizing. Being in N. America means that most of the hardware that’s available isn’t compatible. And that’s before you add the additional issue of my needing a pull that will cover the three holes in each of my doors. Joanne (who helped me) was SO helpful, and was amazingly able to find something that could work, but I couldn’t bring myself to pay $50US each (and that’s before taxes, shipping, and those glorious duty fees). The search continues, but I have an inkling of a plan.

Cabinet door with three holes drilled
I took my current door hardware off and you can see why I have a need for a handle with a backplate. Each door has three holes from when I changed the handles out a number of years ago.
After Upper Canada Hardware I headed over to Home Depot to do some research on what I might need to buy for tiling (turns out it’s a lot) and I picked up a few 3”x6” subway tiles so I could double check I liked them in my kitchen. On Sunday I went to Olympia Tile to take a look to see if they had anything other than basic subway tiles that I might like. I picked up a few samples – one a small mosaic, a 2”x8” tile in both white and pale grey, and another 3"x6" tile in white. I picked up the pale grey as I wondered whether grey would make the backsplash just a bit more interesting – sadly the colour of the tile isn’t right with my counter.  Now though, I’m questioning my plan to use basic 3”x6” tiles – should I go with the 2”x8” instead?? It will mean many more tiles I potentially have to cut, but maybe it's a bit more modern, and slightly less common? What would you do?

Kitchen back splash tile options on a grey counter-top
From top: 2"x8" grey tile - $3.85/sqft; Small white mosiac tiles $3.73/sqft; White 2"x6" tile $3.02/sqft; 2"x8" white gloss tile - $3.75/sqft; All from Olympia Tile
So far I’ve avoided making a list of things I still need to do to complete in this One Room Challenge, but I think that with just two weeks left I need to list them no matter how panicked it makes me. Anyways, here’s the stuff I still need to do:
  • Finish plastering/fixing walls
  • Prime walls
  • Paint ceiling and back wall
  • Pick wall tile
  • Purchase wall tile, mastic, grout and all needed supplies
  • Tile the walls
  • Grout the walls
  • Clean up ALL THE DUST
  • Figure out what to do for cabinet pulls
  • Hang ceiling fixture
  • Figure out some art for the walls to add some colour
  • Install new faucet
  • Add baseboard to the back wall
Ugh – listed like that it seems like a HUGE amount of work I need to get one in a pretty short period of time. I hope I can finish it all in time!

Want some more One Room Challenge makeovers? Make sure you check out the 20 featured designers doing the One Room Challenge, and the other One Room Challenge Guest Participants.

Design

One Room Challenge | Week Three | At Halftime

April 19, 2018

How are we already in week three of the One Room Challenge?? I swear it was only yesterday that I was writing my week two post, and here we are a full week later I’m starting to feel the pressure. I’ve made some progress, but I’m not as far into this makeover as I hoped I would be by this point.

First up – some progress.  All the tile is gone!! I debated about taking off the 4” backsplash that matched my counter (my mom voted to keep it), but I’ve always thought that line of grey up the wall made the room look shorter, so off it came. Not quite sure how I’m going to dispose of it – it’s 7ft long and I’m not allowed to put construction debris in my building’s garbage.

Kitchen with back splash tile removed
All the tile is gone! Also, I need to figure out what to do with that 7ft piece of backsplash on the right . .
I’ve started to repair the damaged walls for the new tile. While it doesn’t have to be perfect, it does need to be much better than it was. In a few places I made some holes significantly bigger in order to find stud to properly install replacement drywall. Home Depot sells drywall in really handy 2ft square pieces of sheetrock which is great for someone like me who only needs a small bit and who also has a car (the pieces also fit perfectly in a black garbage bag if it’s pouring rain on the day you go to buy it – ask me how I know). I also used fiberglass tape in two sizes to repair some of the smaller holes.

Back splash wall before and after patching
The drywall was repaired with a number of small pieces of drywall so was very unstable. I cut them out and patched with just one piece of drywall.  It's hard to see in this image, but the white thing above the outlet is a disconnected knob from ancient knob and tube wiring.
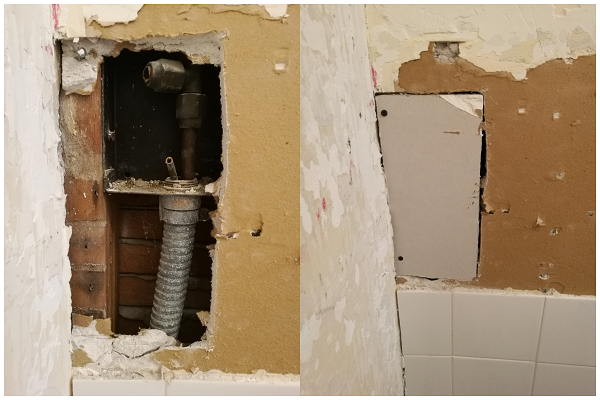
I found some interesting things in the wall. There was some disconnected knob and tube, and in the corner behind the fridge I found a weird metal conduit with a small pipe and what looks like a valve coming out of it – anyone know what I might have been for?

before and after of drywall patch with mysterious pipe inside wall
In a spot behind the fridge the wall was again repaired very badly - I cut out a piece to repair it and found the conduit and pipes on the left. any ideas what they might have been fore?
I had both a plumber and an electrician here on Friday, so both of those ‘issues’ with my kitchen have been sorted out, although at cost that I hadn’t budgeted for.  The plumbing isn’t too exciting – he just replaced all my old shut-off valves with new ball valves.  The electrician took care of the scary ‘handy-man special’ electrical work that was in one of my cabinets. It’s not how I’d have wired my kitchen if I was starting from scratch, but it’s 100% better than it was. Also, as a bonus I can now fit two more coffee mugs in the cupboard. Maybe I’ll treat myself to this, or this :) 

New in-cabinet plug for my under cabinet lighting
If you remember the plug situation from last week - this is a huge improvement.
What’s been occupying most of my brain this week has been the search for replacement pulls for my cabinets. In last weeks post I shared a pull I loved, but at $140 each  there is sadly no possible way they work in my kitchen. I need to replace the 9” Ikea Spann handles I installed way back in 2012 which might normally not be a problem, but since I used them to replace much smaller pulls there are actually three holes in each cabinet door. This of course means that any pull I choose must have a back plate to hide them. Long pulls with a backplate are proving VERY hard to find.

Brass pulls with back plate
1. Nest Studio - Mod-12 2. Home Depot - Richelieu  3. Rejuvenation - Tolson 4. Rejuvenation - Patton 5. Rejuvenation - Bowman 6. Schoolhouse - Midvale 7. Rocky Mountain Hardware - Empire 8. Richelieu 9. Buster + Punch - Pull Bar 10. Amazon - Glacier 11.Horton Brasses - BRW-203 12. Amazon -  Ingot Pull 13. Rejuvenation - Upton 14. CB2 - Hex
I’ve got a Pinterest board of brass handles and pulls that you can check out, but here are some of the pulls I’ve found with backplates. So far none of them are ‘The Ones’ whether due to size, price, etc, so I’m still on the hunt. And yes, I’ve considered just spray painting my current pulls, but I’ve heard that doesn’t last long on frequently used items like door handles, and well, I live in Canada – given we had a massive rain/ice/snow storm on Monday I’m not entirely sure spring will arrive before the end of ORC and for long enough for me to do the work outside.

For next week I’m hoping to have all the plastering/sanding done on the walls, and to have primed them. I’m also really hoping I can at least get started on the tiling as I’m terrified about how long it will take me to do it given I’ve never tried it before. If I do get the tiling started I need your opinion on where to stop the tiles. Do I just to the back walls, or do I do some back splash on the side walls as well? (Please excuse the decidedly amateur mock-ups.)

Mock up of backsplash option
Should I tile just the back wall?
mock-up of backsplash option
Or should I also tile some of the wall beside the counter?
Let me know what you think, and please share any tips (or recommendations for Youtube videos) you have for tiling - I think I'm going to need all the help I can get.

Want some more One Room Challenge makeovers? Make sure you check out the 20 featured designers doing the One Room Challenge, and the other One Room Challenge Guest Participants.

Design

One Room Challenge | Week Two | Plans, Progress and Problems

April 12, 2018

If you read my One Room Challenge post last week you know that my decision to join in this go-round was a last minute one so I didn’t really have a plan other than to get rid of the much-hated mustard yellow accent wall tile. A problem I’ve always had while looking for inspiration for my kitchen was my navy-blue floor as I knew it had to stay as would the mid-grey counter top. This is an odd combo so finding inspiration was quite difficult.
Blue kitchen with brass accents by Emily Henderson
Kitchen by Emily Henderson
I saw the kitchen above on Emily Henderson’s blog and I was immediately smitten – Blue, grey, brass. Sigh – so pretty. Her floor is patterned cement tile, but the colours reminded me enough of my own space that I was inspired. I immediately plotted to replace the bottom doors on my cabinets with some shaker style doors  in a blue-grey while keeping the more modern  high-gloss white slab doors on top; update the backsplash, faucet and hardware.

And then my imaginings came plummeting back to earth with a big splat. My kitchen is an older Ikea kitchen (their Akurum  line, vs their current Sektion) so I couldn’t just go to and buy replacement doors in the store. I know there are a bunch of companies that now market ‘custom’ doors for Ikea frames - I did a little research, but sadly determined that replacing the doors is not currently in my budget given the shipping charges alone from one company were going to be at least $300 (and that didn’t include any doors, duty, taxes, or any other fees).
Eamonn & Jack - Kitchen one room challenge inspiration
Anyways, here’s my scaled-back plan:
  • I’ll be replacing the backsplash with white subway tiles. I still have to decide if I should go with white grout or maybe a light grey for some definition and to tie in with my counter. Given I’m planning on doing the tiling myself that decision will likely only be made after I’ve seen if I’m a good tiler or not – Ha!
  • I’m updating my faucet with the Delta Trinsic faucet in Champagne bronze. Yes, I know every blogger has this faucet, but I like the look of it, so I bought it anyways.
  • I want to update my kitchen hardware to something brass. We’ll see. I know it won’t be the ones in my mood board – these, the Mod-12 from Nest Studio Collection are $140 each. Since I need 17 these won’t happen which is really too bad as they’re so pretty!
  • I need a new light. I have this West Elm Sphere light that I was going to put in my foyer, but it might work better here.
  • I’ll need to inject some colour into the space, so I’m thinking about some art for the back wall, or maybe a colourful rug. I LOVE this piece by Leslie Weaver, but sadly it’s only 8x10 and I’ll need something bigger.
My mom was in town last week and she helped me get rid of most of the tile!!!  I want to say the space already looks so much better, but it truthfully looks a bit like a bomb went off. Therein lies some of the problems I alluded to in the blog title.
Damaged drywall in a kitchen
I mentioned in last week’s post that my unit had been ‘flipped’ by a previous owner and they had done the kitchen. As we removed the tile it became apparent that they hadn’t properly prepped the walls before adding the tile. I expected the drywall paper to come off. What I didn’t expect was holes to appear as I removed tile that was affixed to improperly patched drywall. I assume the holes were from running the wiring, and they weren’t properly repaired (in some cases they were just ‘glued’ back in place around the edges with joint compound) . Some of the holes are smaller so shouldn’t be too difficult to repair, but there’s one above my oven which is about 10”square so I’m going to have to cut more out to find a stud before I can repair it.
Dodgy wiring in a kitchen cabinet
I'm not an electrician, but even I know that this isn't up to code.
Another issue which I have to deal with is the wiring itself as I’ve always known that it’s a bit dodgy. I don’t think anyone could look at the wiring in the picture above (this is what powers my under cabinet lights and is in the bottom of one of the cabinets) and think that it was up to code. Since the backsplash is already off I’ve decided that I should get an electrician in to take a look and repair as needed. This is easier said than done – electricians are busy. I’ve finally got one coming over to take a look on Friday, and hopefully some work can get done soon so I can proceed with repairing my walls. A plumber is also coming because, as luck would have it, my hot water valve has sprung a leak.

My last problem is self-inflicted. While removing the tiles I had one slice open my finger. Oh my god the blood. No, I was not wearing safety gloves so this is entirely my own fault. Learn from my mistake – always wear safety gear (gloves, glasses, shoes, etc) while doing any DIY.
Finger injury
This is several days after the top of my finger was sliced off by a flying tile. PSA - wear work gloves!
That’s it for week two. I’m hoping that my appointments with the plumber and electrician go well tomorrow so I can get started on repairing the walls and prepping them for tile. I’ve got tickets to go see Yakoi Kasuma: Infinity Mirrors at the AGO on Saturday so I’ll only have one day to work on the kitchen this weekend - hopefully I’ll be able to make some progress. Wish me luck!

Want some more One Room Challenge makeovers? Make sure you check out the 20 featured designers doing the One Room Challenge, and the other One Room Challenge Guest Participants.

Design

One Room Challenge | Week One | Kitchen Makeover

April 04, 2018

On March 31st I celebrated 8 years in my apartment. 8 years. Seems like just last week that I was getting the keys and then sitting in the middle of the empty living room floor with a glass of wine. I moved in with very limited furniture (bed, dresser, bookcase) and over the years I’ve furnished my home with new, and new to me pieces (I’ve shared some of them on this blog) and I’m mostly happy with the way that my apartment has come together.
That said, two rooms have been difficult to put my stamp on and those are my bathroom and kitchen. My bathroom needs a full-gut reno which scares the crap out of me. The logistics, time, and the money required to fully reno my one and only bathroom have kept me from finally pulling the trigger on it. The other room is my kitchen. Hate is a pretty strong word, but I pretty-much hate my kitchen.

When I bought my place I inherited a kitchen that had been ‘flipped’ and year or so beforehand by a couple that had spent some time in Portugal, and had made some design choices that might have been better suited for that country. One of their decisions was to install doors between every single room in the apartment (I think this is common in Europe, but not in N. America).  This was easily rectified, and I even made some money selling the doors on kijiji/craigslist. One of their other ‘improvements’ was to the kitchen where they tiled every available wall surface with square white ceramic tiles, with two rows of embossed tiles in mustard yellow as an accent.  That yellow accent tile combined with the blue floor tile (common in my building) bugged me every time I entered the kitchen.
My Kitchen before - complete with mustard yellow accent tiles
My kitchen 'before'. This is from 2012, but nothing much has changed. Note the bane of my existence - the yellow wall tile.
I’ve talked about pulling down the wall tile and backsplash since I moved in - I even had some people in to give me some quotes on getting it done but the numbers I was quoted didn’t make sense. One guy told me he’s just glue thin drywall over the tile to make it ‘go away’. I don’t know much about construction, but I know just ‘covering up’ an issue isn’t usually the best way to deal with it.

One Room challenge Guest Participant
Anyways, to make this long story short – I decided this past weekend that is was time to stop complaining about my kitchen and actually do something about it. As luck would have it, it’s also time for another One Room Challenge (I did the One Room Challenge once before way back in 2014). I figure a set deadline of 6 weeks will help keep me focused.

I last blogged about my kitchen WAY back in 2012 when I updated my kitchen handles. Since then I haven’t really made any changes other than upgrade the puck lights under the cabinets to LED and I put in a pendant light I cobbled together from some bits at the ReStore (the halogen lights made such a small space really warm). Sadly as my budget doesn’t allow for a gut, this will be a mostly aesthetic makeover. That said I’m hoping that the changes I make over the next 6 weeks will allow me to love my kitchen.

This was such a last minute decision that I don't really have any plans as of yet for this makeover other than to get rid of the tile - Ha!! I guess I'll have to start mining my kitchen board on Pinterest for some ideas. Next week I'll show you some inspiration and hopefully I'll have a bit more of a plan and (more importantly) less yellow wall tile! I hope you’ll follow along while I learn if ripping off wall tile is as easy as they make it look on HGTV and Youtube. Cross your fingers for me.

Want some more One Room Challenge makeovers? Make sure you check out the 20 featured designers doing the One Room Challenge, and the other One Room Challenge Guest Participants.

Book Review

Big Little Lies - A Book Review

March 07, 2018


Big Little Lies by Liane Moriarty book review
I think I’ve mentioned before that I tend to be a person who tends to always read a book before seeing the movie and/or TV series that is based on it. Big Little Lies has been a TV show (and judging by the latest awards season – a good one) for over a year and I’ve only just finished the book. I’ve just finished it, and I’m having trouble writing exactly how I feel about it. If I was to say I loved it that would be a little lie. If I say I hated it that would be a big lie. And yet, here I am unsure about what to tell you.

Big Little Lies centers on a group of three women who each have young children in the same Kindergarten class. Madeline, who takes no shit from anybody, but who has an ex-husband who has moved his new wife and their daughter to town and enrolled her in the same class. Celeste who seems to have it all – beauty, wealth, a doting husband, and twin boys, but is there something else going on with Celeste? Jane is new to town, and a young single mom of a son named Ziggy (aside – seriously – that’s the kids name). Over a twisted ankle and some champagne, the three women form unlikely bond that sets the stage for all the drama that follows. Oh calamity.

I actually tried to read this book last year and didn’t get very far into it before giving up. I’m not sure what it was about the book that I had trouble with – maybe it’s because I couldn’t relate to the characters on a personal level? They’re all moms and I’m not lucky enough to be one. Maybe it was the stylistic approach to using gossipy conversations between other moms in the class to move story lines ahead. Is it possible moms are that catty and judgemental of each other? Whatever it was I gave up about a quarter of the way through, but added it back to my hold list at the library once the HBO show started getting all the press.

Having now finished it I can say that I sort-of liked it. The beginning is a bit slow, but the story picks up as you get further into the book. I will say that I accurately predicted most of the plot twists at the end, but maybe some of them were more surprising to other readers? If you’ve read the book, did you predict the outcomes? Did you like the book? Have you seen the mini-series because I do plan on watching it soon.

Big Little Lies book cover
Book Title: Big Little Lies
Author: Liane Moriarty
Genre: Suspense & Thriller
Pages: 512
My Rating: Three Stars
Buy the Book: Amazon
From the Publisher: From the author of Truly Madly Guilty and The Husband’s Secret comes a novel about the dangerous little lies we tell ourselves just to survive.

A murder…A tragic accident…Or just parents behaving badly? What’s indisputable is that someone is dead.

Madeline is a force to be reckoned with. She’s funny, biting, and passionate; she remembers everything and forgives no one. Celeste is the kind of beautiful woman who makes the world stop and stare but she is paying a price for the illusion of perfection. New to town, single mom Jane is so young that another mother mistakes her for a nanny. She comes with a mysterious past and a sadness beyond her years. These three women are at different crossroads, but they will all wind up in the same shocking place.

Big Little Lies is a brilliant take on ex-husbands and second wives, mothers and daughters, schoolyard scandal, and the little lies that can turn lethal.

recent posts

Like us on Facebook

Follow us on Pinterest

//]]>